Sockets in an apartment: how many you need, at what height, and where to put them
Sockets in an apartment are planned once, before the chases are cut, and you live with them for years. This guide covers how many sockets you need by code and in practice, at what height to put sockets and switches, what changes in the kitchen, bathroom, hallway, home office, kids’ room and balcony, which appliances need dedicated circuits, and how to build such a plan on the walls of your own home in FUTURIO Home.
Danylo Shevchenko, founder of FUTURIO
In short: how many sockets you need and at what height
How many. The Ukrainian code for apartments requires at least one socket for every full or partial 4 m² of a living room, one per 10 m² of corridor and no fewer than five in the kitchen; several sockets in one frame count as one. That is the lower limit. A comfortable number is the one where every appliance has its own socket and there are no extension leads in the home.
Height. There is no single “standard” height: the code asks for sockets to be where they are convenient to use. Working reference values, from the finished floor to the centre of the frame: 300 mm for an ordinary socket, 700 mm by the bed, about 900 mm above a desk, 1000 mm for a switch, 1080 mm above a kitchen worktop, 1800 mm behind a wall-mounted TV, 2200 mm for an air conditioner.
Kitchen. Sockets above the worktop sit at least 300 mm from the sink and the hob and never above them. The oven, electric hob, dishwasher and washing machine get dedicated circuits from the consumer unit.
Bathroom. An ordinary socket goes only outside the zones around the bath and shower, at least 0.6 m from their edge, on a circuit with a 30 mA residual-current device (RCD) and with a cover.
Safety. The circuit layout, cable sizes and protection are decided by an electrician under the codes in force. A socket plan answers a different question: where exactly each point should be in your home so that it is convenient to use.
In FUTURIO Home the socket plan is built on the walls of a home with the furniture already placed, and the heights and distances to the corners go straight into the drawings for the electrician.
Minimum by code, quantity by appliances, height by furniture, protection by the electrician.
Plan the sockets for your room
Pick a room and mark what will be in it: a wall-mounted TV, a desk, an air conditioner or a washing machine. The list of points rebuilds itself: for each one you get the height from the finished floor, the number of sockets and whether a dedicated circuit from the consumer unit is needed. Further down, every room is covered in detail.
Kitchen
- Above the worktop — 1080 mm: One frame with 2–3 sockets in each work zone; at least 300 mm from the sink and the hob and not above them.
- Fridge — 200 mm: An outlet in the neighbouring cabinet or where the model’s manual says, so the plug can be reached.
- Extractor hood — above the cabinets: A socket or cable outlet in the cabinet above the hood, as the model’s manual says.
- Hob — 200 mm or per the manual: A power outlet or 32 A socket under the worktop, fed by a dedicated circuit from the apartment’s consumer unit.
- Oven — 200 mm or per the manual: An outlet in the neighbouring cabinet, not behind the oven itself, so that it can be disconnected without removing it.
- Dishwasher — 200 mm: A socket in the neighbouring cabinet, not behind the machine and not under the sink trap.
- Washing machine — 200 mm: A dedicated earthed socket in the neighbouring cabinet, away from water.
- Countertop appliances — 1080 mm: Another frame where appliances stay permanently, so they do not occupy the working sockets.
- Floor outlet for the island — in the floor: Laid before the screed: a cable in conduit under the floor or a service pillar; the socket goes on the end of the island.
Bedroom
- By the headboard, both sides — 700 mm: A frame above the nightstand: two sockets and a bedside light switch.
- Switch by the door — 1000 mm: On the door-handle side; paired with a switch by the bed as a two-way switch.
- By the door — 200–300 mm: For the vacuum cleaner, so you do not drag an extension lead across the room.
- Behind the TV — 1800 mm: A frame with 2–3 sockets under the mount, behind the screen.
- Internet behind the TV — 1800 mm: A network socket next to the power ones: a cable is more reliable than wireless.
- Above the desk — ≈ 900 mm: 150 mm above the worktop: 3 sockets for a lamp, a laptop and chargers.
- Above the dressing table — ≈ 900 mm: For a hair dryer and mirror lighting, 150 mm above the tabletop.
- By the indoor unit — 2200 mm: To the side of the unit, not above the bed; sometimes the installer asks for a cable outlet without a socket.
- By the curtain rail — below the ceiling: A cable outlet to the side of the window, near the end of the rail.
Living room
- By the sofa — 300 mm: To the side of the sofa, not behind the back: for a floor lamp and a charger.
- Switch by the door — 1000 mm: On the door-handle side.
- By the door — 200–300 mm: For the vacuum cleaner.
- Behind the TV — 1800 mm: A frame with 3–4 sockets under the mount: TV, set-top box, soundbar, router.
- Internet and aerial behind the TV — 1800 mm: Network and aerial sockets next to the power ones.
- Above the stand — ≈ 600 mm: Above the top of the stand so the cabinet does not cover the sockets.
- Floor socket — in the floor: A floor box under the table, laid before the screed.
- By the indoor unit — 2200 mm: To the side of the unit; a dedicated circuit if the manual requires it.
- Above the desk — ≈ 900 mm: 150 mm above the worktop, with a network socket alongside.
Bathroom
- By the washbasin — ≈ 1100 mm: For a hair dryer and a razor, at least 0.6 m from the edge of the bath or shower tray; a socket with a cover.
- Light switch — 1000 mm: Outside, by the door, so it can never end up in a wet zone.
- Extractor fan — below the ceiling: A cable outlet together with the light or with a separate switch or timer.
- Washing machine — ≈ 1000 mm: To the side of the machine, outside zones 0–2, a socket with a cover.
- Water heater — by the boiler: A dedicated circuit; the connection point and protection are as the boiler’s manual says.
- Towel rail — per the manual: Usually a cable outlet without a socket, outside zones 0–2 or an appliance of a suitable protection class.
- Thermostat — ≈ 1000 mm: Outside the wet zones or on the outside by the door.
- Outlet behind the mirror — behind the mirror: A cable to the backlight, no visible socket.
Hallway
- Switch by the front door — 1000 mm: On the handle side; in a long corridor, two-way switches at both ends.
- For the vacuum cleaner — 200–300 mm: By the entrance or in the middle of the corridor.
- Router and low-voltage panel — at the panel’s position: A socket next to it and the entry of the internet cable; from here the network cables run to the TV and desks.
- Door entry panel — ≈ 1500 mm: By the front door, at eye level.
- Outlet behind the mirror — behind the mirror: A cable to the backlight, no visible socket.
- Socket by the wardrobe — 200–300 mm: To the side of the carcass or in the niche the wardrobe maker provides.
Home office
- Above the desk — ≈ 900 mm: A frame with 3–4 sockets, 150 mm above the worktop.
- Network socket — ≈ 900 mm: Next to the power ones: for a computer a cable is steadier than wireless.
- Switch by the door — 1000 mm: On the door-handle side.
- By the door — 200–300 mm: For the vacuum cleaner.
- By the printer — 300 mm: A separate socket where the printer will stand.
- Floor socket — in the floor: A floor box under the table, laid before the screed.
- By the indoor unit — 2200 mm: To the side of the unit, not above the workplace.
Kids’ room
- By the bed — 700 mm: For a night light; not behind the cot, so the child does not reach for the socket.
- Above the desk — ≈ 900 mm: 150 mm above the worktop: a lamp and chargers.
- Switch by the door — 1000 mm: On the handle side, at a height the child can reach.
- By the door — 200–300 mm: Just one low socket, for the vacuum cleaner, away from the play area.
- Behind the TV — 1800 mm: A frame with 2 sockets and a network socket behind the screen.
- By the indoor unit — 2200 mm: To the side of the unit, not above the bed.
Balcony
- Light switch — 1000 mm: In the room, by the balcony door.
- Socket — 300–1000 mm: On an open balcony, with a cover and a protection rating of at least IP44.
- Above the desk — ≈ 900 mm: Only on an insulated balcony; a network socket alongside.
- Route to the unit — per the installation design: The power cable and the refrigerant route follow the air-conditioner installer’s scheme.
- Thermostat — ≈ 1000 mm: In the room or on the insulated balcony.
Start with a list of appliances: the number and positions of sockets follow from it.
How many sockets an apartment needs
The Ukrainian rules for designing residential electrical installations, in force since 1 January 2026, require at least one socket for every full or partial 4 m² of a living room. For a 14 m² bedroom that is four socket positions. An important clarification: the code counts several sockets in one frame as one, so four positions can give ten to twelve outlets. In a corridor it is one socket per full or partial 10 m², and in the kitchen at least five.
The code protects against the worst case, but not against an extension lead behind the sofa. So count from appliances: for each room write down everything that is plugged in all the time — lamps, TV, router, chargers, vacuum cleaner — and add a reserve of one or two sockets in each zone. Over the years there is more equipment, and a new socket after the renovation means a chase and repainting the wall.
A designer’s tip: group sockets into frames by the places where they are used — by the bed, desk, sofa, TV. Three sockets in one frame look tidier and are more convenient than three separate points around the perimeter of the room.
| Room | Code minimum | Comfortable in practice |
|---|---|---|
| Bedroom, 14 m² | 4 positions | 10–14 outlets · by the bed, desk, door |
| Living room, 20 m² | 5 positions | 12–16 outlets · TV area and sofa |
| Kitchen | 5 sockets | 8–12 sockets · plus outlets for appliances |
| Hallway, 6 m² | 1 socket | 2–3 · vacuum cleaner and router |
| Home office, 10 m² | 3 positions | 8–10 outlets · desk and printer |
The code sets the minimum number of positions; the number of outlets follows from your appliances.
Standard height of sockets and switches from the floor
Height is measured from the finished floor — from the final floor covering, not from the screed — to the centre of the frame. If the installer measures from bare concrete and then the screed, parquet and skirting go down, a low socket can end up hidden behind the skirting.
Sockets. The Ukrainian code does not set a single height: sockets go at a height convenient for appliances, taking into account the purpose of the room and the interior. The previous edition limited residential sockets to one metre from the floor; the new one has no such limit, so a socket above a kitchen worktop or behind a TV sits where it belongs. In German practice, ordinary sockets are placed about 300 mm from the floor.
Switches. The code recommends placing the light switch on the door-handle side at a height of 0.8 to 1.7 m. The most convenient is about 1000 mm: your hand finds the switch by itself as you open the door. In homes for wheelchair users, switches and sockets go at 0.8 m.
The diagram below shows a whole residential “wall” with the typical points. Click a marker or a button under the diagram to see exactly where and why such a socket is placed.
- 200 mm — by the door and under the worktop. A vacuum-cleaner socket by the door and appliance outlets under the kitchen worktop, in the neighbouring cabinet so the plug can be reached.
- 300 mm — ordinary socket. A typical low socket: by the sofa, to the side of the window, in the vertical zone 10–30 cm from the reveal.
- 700 mm — by the headboard. Above the bedside table: you can see the plug and do not have to crawl under the bed.
- 900 mm — above the desk. 150 mm above the worktop: for a standard desk that is about 900 mm.
- 1000 mm — switch. By the door on the handle side; the code allows 0.8–1.7 m, and 0.8 m in homes for people with reduced mobility.
- 1080 mm — above the worktop. The centre of the frame on the kitchen backsplash: at least 300 mm from the sink and the hob.
- 1800 mm — behind the TV. Under the mount, behind the screen: the cables are hidden and the bracket does not get in the way of the plug.
- 2200 mm — air conditioner. To the side of the indoor unit; the exact place and type of connection are as the manual and the installer say.
Write heights from the finished floor to the centre of the frame — then the electrician and the tiler count the same way.
Installation zones: where cables may run in a wall
Concealed wiring is not run at random but in strips called installation zones. They are described by the German standard DIN 18015-3, and the Ukrainian code gives the same zones in an informative annex. The point is simple: if everyone knows where a cable may be in the wall, nobody drills into it while hanging a shelf.
Horizontal zones are 30 cm wide: the upper one is from 15 to 45 cm below the ceiling, the lower one from 15 to 45 cm above the floor, and the middle one from 100 to 130 cm above the floor, only on walls with work surfaces, such as in a kitchen.
Vertical zones are 20 cm wide: from 10 to 30 cm beside door and window edges and beside wall corners. Sockets and switches go in these strips or on their continuation, and the cable to them runs straight — horizontally or vertically, no diagonals.
Floor. There are zones in the floor too, for sockets in the middle of a room: a strip up to 30 cm wide, at least 20 cm from the wall. Such a cable is laid in conduit before the screed, and the socket goes in a floor box or a service pillar.
In our home scheme the cable runs in the upper zone under the ceiling and drops to each point vertically. That way the route does not cross furniture, skirting or the floor, and the route above a socket is always predictable: it goes straight up.
Cables only in installation zones and only in straight lines: then a shelf never meets the wiring.
Why our scheme has no socket under a window
Honestly: there is no general ban on placing a socket under a window. The installation zones also allow the lower horizontal strip above the floor, so an electrician can bring a cable under the window sill from below, from a neighbouring socket.
We, however, run wiring in the upper zone and drop the cable to the points vertically. Under a window such a drop is impossible: the opening itself blocks the path. That is why the FUTURIO Home editor does not let you place a socket under a window, explains the reason, and suggests a spot to the side, in the vertical zone by the reveal.
There are everyday reasons too. A radiator usually sits under the window, with curtains and tulle next to it, and a socket behind a curtain is awkward and hides from view together with its extension lead. To the side of a window a socket is closer to a floor lamp or a desk.
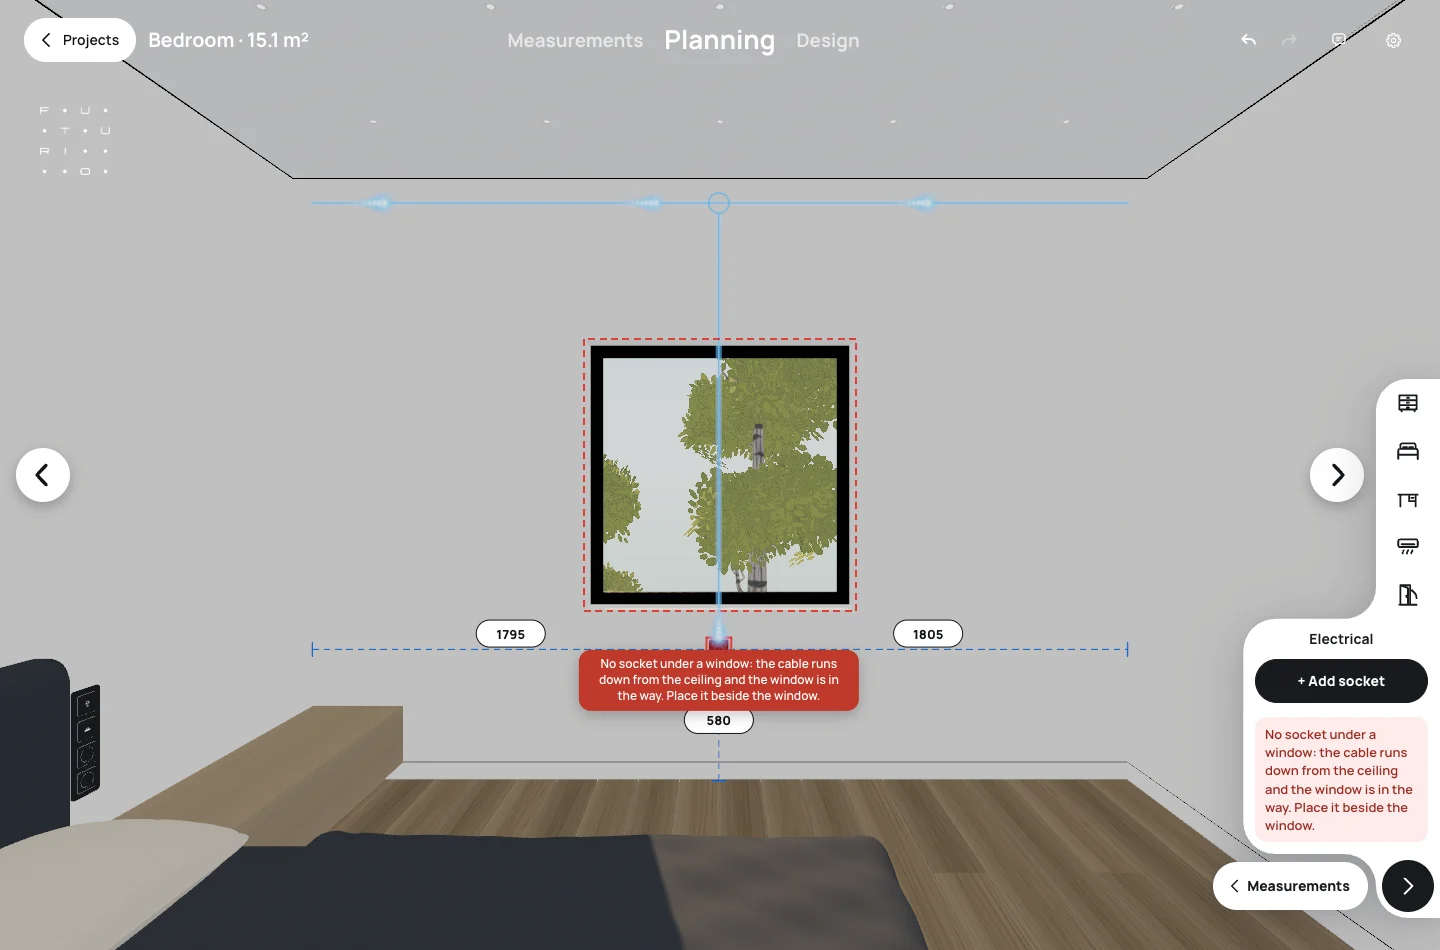
Plan a socket by a window to the side of the opening — there the cable drops calmly from the ceiling.
Bedroom: sockets by the bed and switches
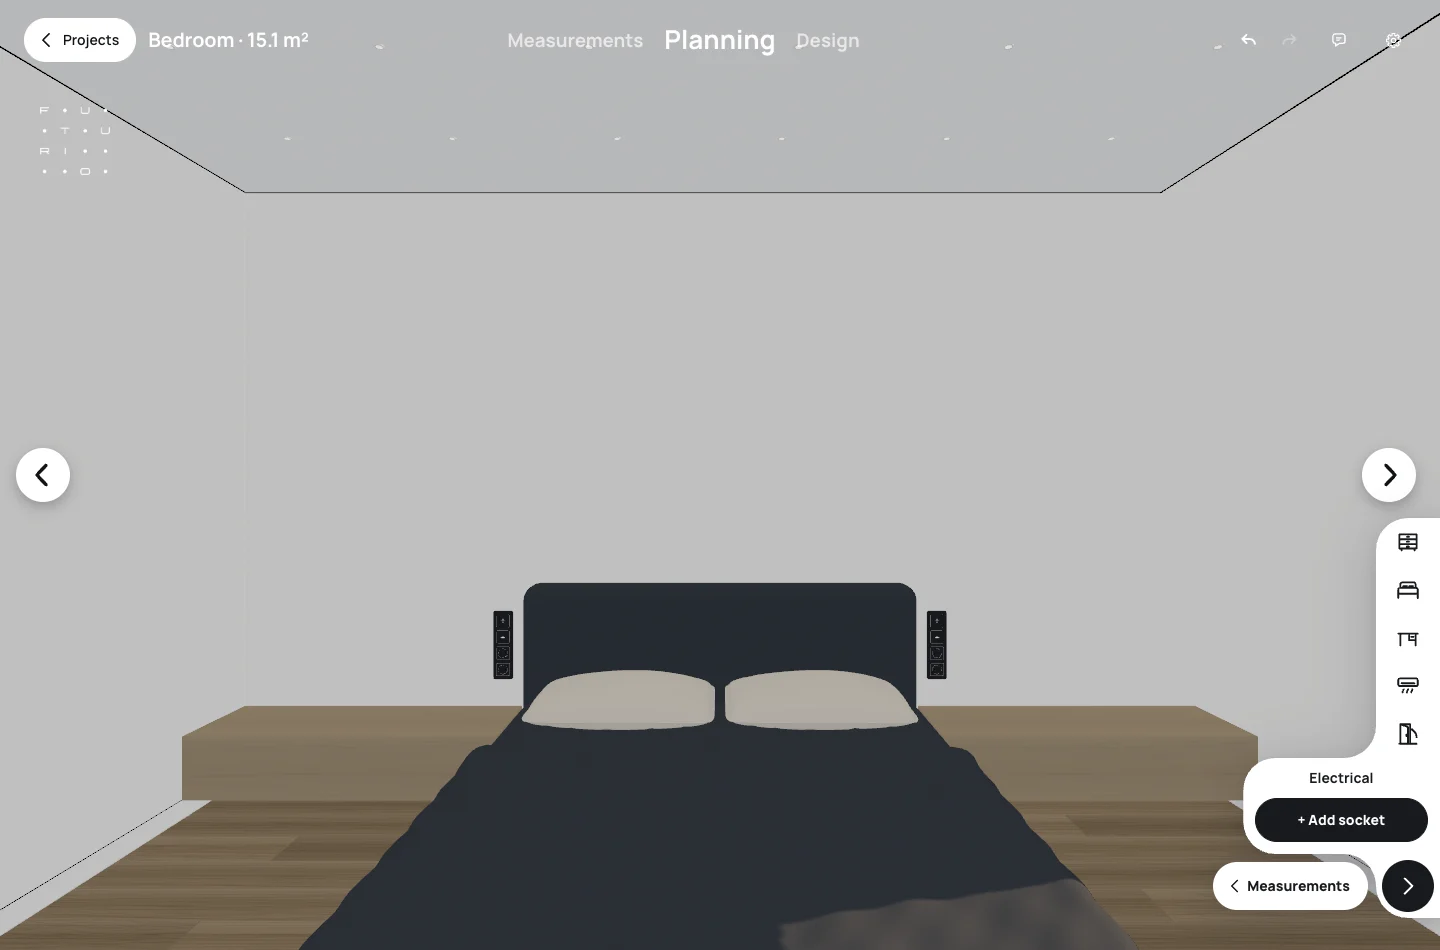
At the headboard a person needs three things: switch the light off without getting up, switch on a night light and put a phone on charge. So on both sides of the bed goes a frame with a bedside light switch and two sockets — about 700 mm from the floor, above the nightstand. That way the plug is visible and you do not have to crawl under the bed.
The main light switch is by the door, on the handle side. If you duplicate it by the bed as a two-way switch, the light can be switched off from both places. By the door add a low socket for the vacuum cleaner, and above the dressing table or desk a frame 150 mm above the worktop.
An air conditioner in a bedroom is placed so the airflow does not blow on the bed, and the socket or cable outlet goes to the side of the indoor unit, about 2200 mm from the floor.
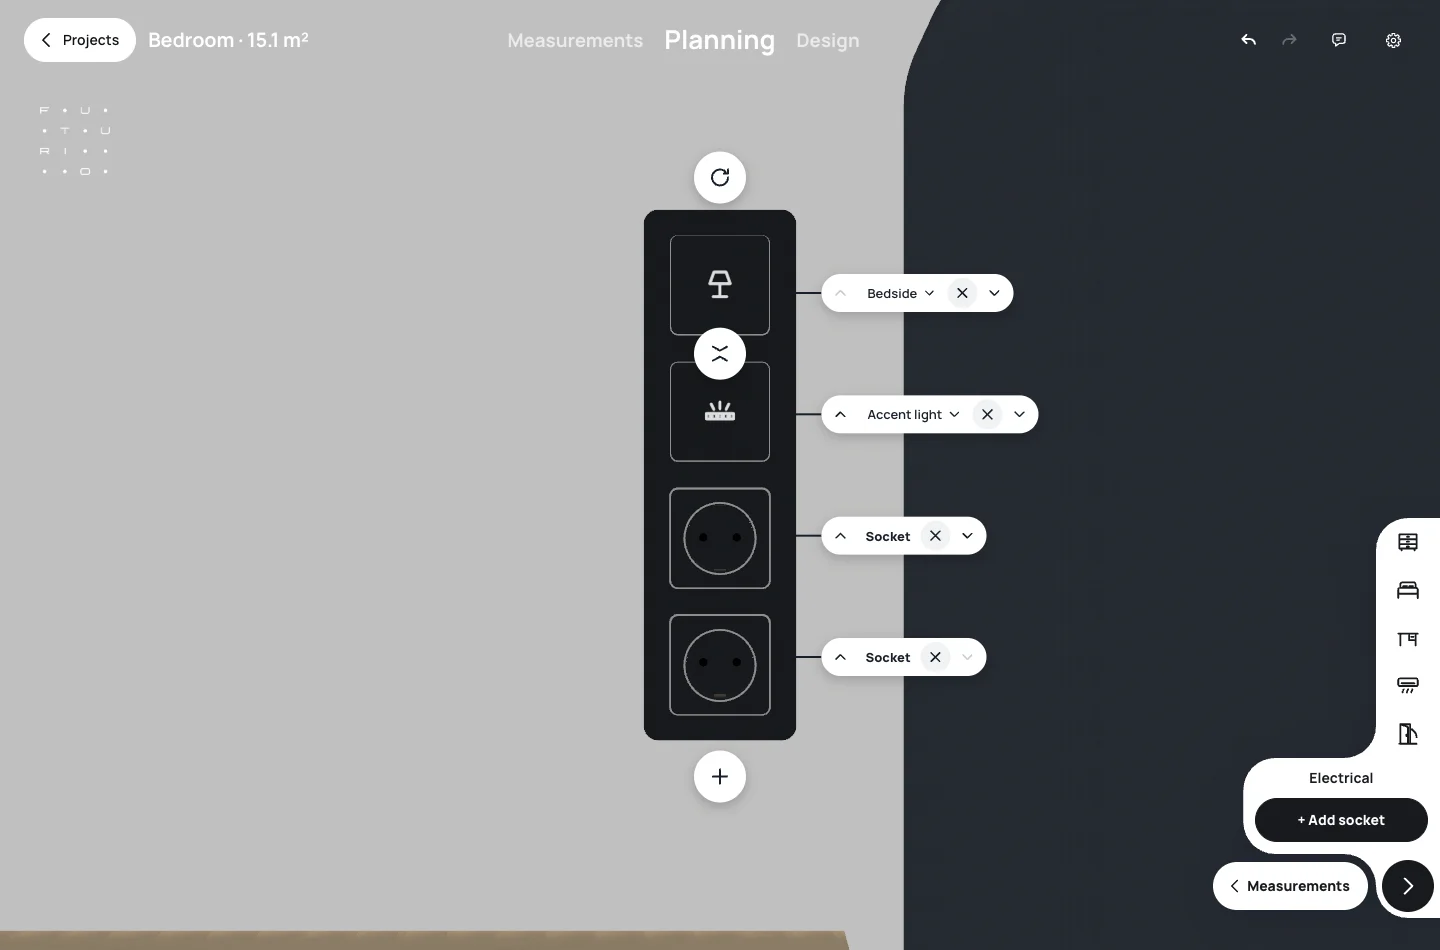
By the bed, plan the light and the charging together, in one frame.
Living room: sockets behind the TV and by the sofa
The socket behind a TV should be hidden behind the screen but not behind the bracket, otherwise you cannot plug in. For a wall-mounted TV, about 1800 mm from the floor is convenient, centred under the lower bar of the mount: the cables go down behind the screen and are not visible. Put in a frame with 3–4 sockets at once — for a set-top box, a soundbar, a router — and next to it a network socket and an aerial socket.
If the TV will stand on a stand, raise the sockets above the top of the stand, to about 600 mm, so the cabinet does not cover them. By the sofa, sockets go to the side, not behind the back: a floor lamp and a charger can reach them, and the sofa can still be moved.
A dining table or workspace in the middle of the living room is a reason to put a socket in the floor. This is decided before the screed, while a conduit with a cable can still be laid.
Around the TV there is always more equipment than you think: plan a frame with several sockets and a network connection.
Kitchen sockets: height above the worktop, clearances and appliances
Above the worktop. Sockets go on the backsplash, with the centre of the frame about 1080 mm from the finished floor for a 900 mm worktop. The code allows kitchen sockets at the height the technology requires, and the installation zones reserve a strip 100–130 cm above the floor for them.
Clearances. The code does not set a specific distance from the sink. A British electrical-safety charity advises keeping sockets at least 300 mm from water and heat sources — the sink and the hob — and never above them. We use that clearance in our plan.
Under-worktop appliances. The fridge, oven, dishwasher and washing machine get low outlets — about 200 mm from the floor, in the neighbouring cabinet so the plug can be reached without removing the appliance. The exact connection point is set by the manual of the particular model.
Dedicated circuits. For a fixed electric cooker the code requires a 32 A socket and a dedicated circuit from the apartment’s consumer unit; the oven, dishwasher and washing machine are usually also fed by dedicated circuits. A gas hob is connected under a separate gas-supply design.
Island. An island socket goes on its end or side, and the cable arrives from the floor — in conduit under the screed or through a service pillar. This must be decided before the floor is poured.
In the kitchen, place the appliances first, then the sockets: height above the worktop, 300 mm from the sink and hob, and dedicated circuits for high-power appliances.
Bathroom sockets: zones, IP rating and RCD
The bathroom has its own rules — the European standard for rooms with a bath or shower, also adopted in Ukraine. It divides the space around the water into three zones.
Zone 0 is the inside of the bath or shower tray.
Zone 1 is the space above the bath or tray up to 2.25 m from the floor.
Zone 2 is a strip 0.6 m wide around zone 1, up to the same height.
An ordinary socket goes only outside zones 0, 1 and 2 — that is, at least 0.6 m horizontally from the edge of the bath or tray. Equipment in zones 1 and 2 must be protected against splashes to at least IPX4, and where a wall may be hit by a water jet, IPX5. It is worth fitting a socket with a cover even outside the zones. Some countries have stricter rules: in the United Kingdom, for example, ordinary sockets go no closer than 3 m from zone 1.
All bathroom circuits are protected by a 30 mA RCD. The Ukrainian code additionally requires an arc-fault protection device for bathroom sockets and lighting. The light switch is easiest to put outside, by the door.
The washing machine gets a separate socket to the side of the machine, outside the wet zones, about 1000 mm from the floor. The water heater gets a dedicated circuit; the standard allows a fixed boiler of the appropriate design closer to the bath than a socket — the place and protection are as its manual says. A heated towel rail and mirror lighting are usually connected by a cable outlet without a socket.
In the bathroom: only outside the zones, only with a 30 mA RCD and preferably with a cover; protection decisions are the electrician’s.
Hallway, home office, kids’ room and balcony
Hallway. The switch is by the front door on the handle side, in a long corridor two-way switches at both ends. A socket for the vacuum cleaner at 200–300 mm, an outlet for lighting by the mirror, a door entry panel at eye level. The router often lives here too: lay a socket and the entry of the internet cable next to it, and from here the network cables to the TV and the desks.
Home office. Above the desk, a frame with 3–4 sockets 150 mm above the worktop and a network socket alongside. A separate socket for the printer, and if the desk stands in the middle of the room, a floor socket under it.
Kids’ room. In apartments, sockets must have shutters that cover the sockets when no plug is in — in a kids’ room this is especially important. Do not put sockets behind the cot or in the area where the child plays on the floor; a frame by the bed is enough for a night light, and a frame above the worktop for the desk.
Balcony. Plan a glazed, insulated balcony as a room. An open one is the outdoors: a socket with a cover, a protection rating of at least IP44, a circuit with a 30 mA RCD, and the light switch in the room by the balcony door.
Every room in a home has its own scenario: entrance, work, a child’s sleep or the outdoors — plan the points around it.
Dedicated circuits and low-voltage cabling: what to lay before plastering
Socket groups. The code recommends dividing the apartment into at least separate circuits for room sockets, lighting, and kitchen and corridor sockets, and protecting all socket circuits with a 30 mA RCD. Then a faulty iron does not switch off the lights in the whole home.
High-power appliances. A dedicated circuit is usually needed for an electric or induction hob, an oven, a dishwasher and a washing machine, a water heater and an air conditioner. The final list depends on the power of the specific models and the consumer-unit scheme — an electrician draws it up.
Low voltage. Network sockets by the TV and desks, the aerial, the door entry panel and the router cable are laid at the same time as the power ones. Communication cables are run separately from power cables, and the distance between them is set by the installer.
A foreman’s tip: photograph the walls with all the cables before plastering, holding a tape measure from the floor and the corner. A year later, when hanging a shelf, you will know exactly where not to drill.
Dedicated circuits and network cables are laid before plastering — afterwards it is a renovation.
Socket and switch heights in one table
These are working reference values from the finished floor to the centre of the frame, handy for planning. The exact height depends on furniture, appliances and your habits — and can differ by a few centimetres.
| Zone | Height from the floor | Note |
|---|---|---|
| Ordinary socket | 300 mm | By the sofa, beside a window, by a door |
| Vacuum cleaner by the door | 200–300 mm | One per room and corridor |
| By the bed | 700 mm | Above the nightstand, together with a switch |
| Above a desk | ≈ 900 mm | 150 mm above the worktop |
| Light switch | 1000 mm | On the handle side; code range 0.8–1.7 m |
| Above a kitchen worktop | 1080 mm | ≥ 300 mm from the sink and hob |
| Under-worktop appliances | 200 mm | In the neighbouring cabinet |
| Bathroom: washbasin | ≈ 1100 mm | ≥ 0.6 m from the bath or shower, RCD 30 mA |
| Bathroom: washing machine | ≈ 1000 mm | Outside wet zones, with a cover |
| Behind a wall-mounted TV | 1800 mm | Under the mount, behind the screen |
| Air conditioner | 2200 mm | To the side of the indoor unit |
| For people with reduced mobility | 800 mm | Sockets and switches |
Keep the table and check your plan against it — but always verify the height near furniture on site.
How to plan sockets in FUTURIO Home
In FUTURIO Home the electrics come after the furniture is placed. At the “Planning” stage, open the “Electrical” group: the camera turns to the wall, the furniture becomes semi-transparent and locked, so you can see where the bed or wardrobe will be but cannot shift it by accident. The arrows at the sides of the screen switch walls. For now you can plan a kitchen, living room and bedroom this way; the other rooms of a home open as soon as they are ready.
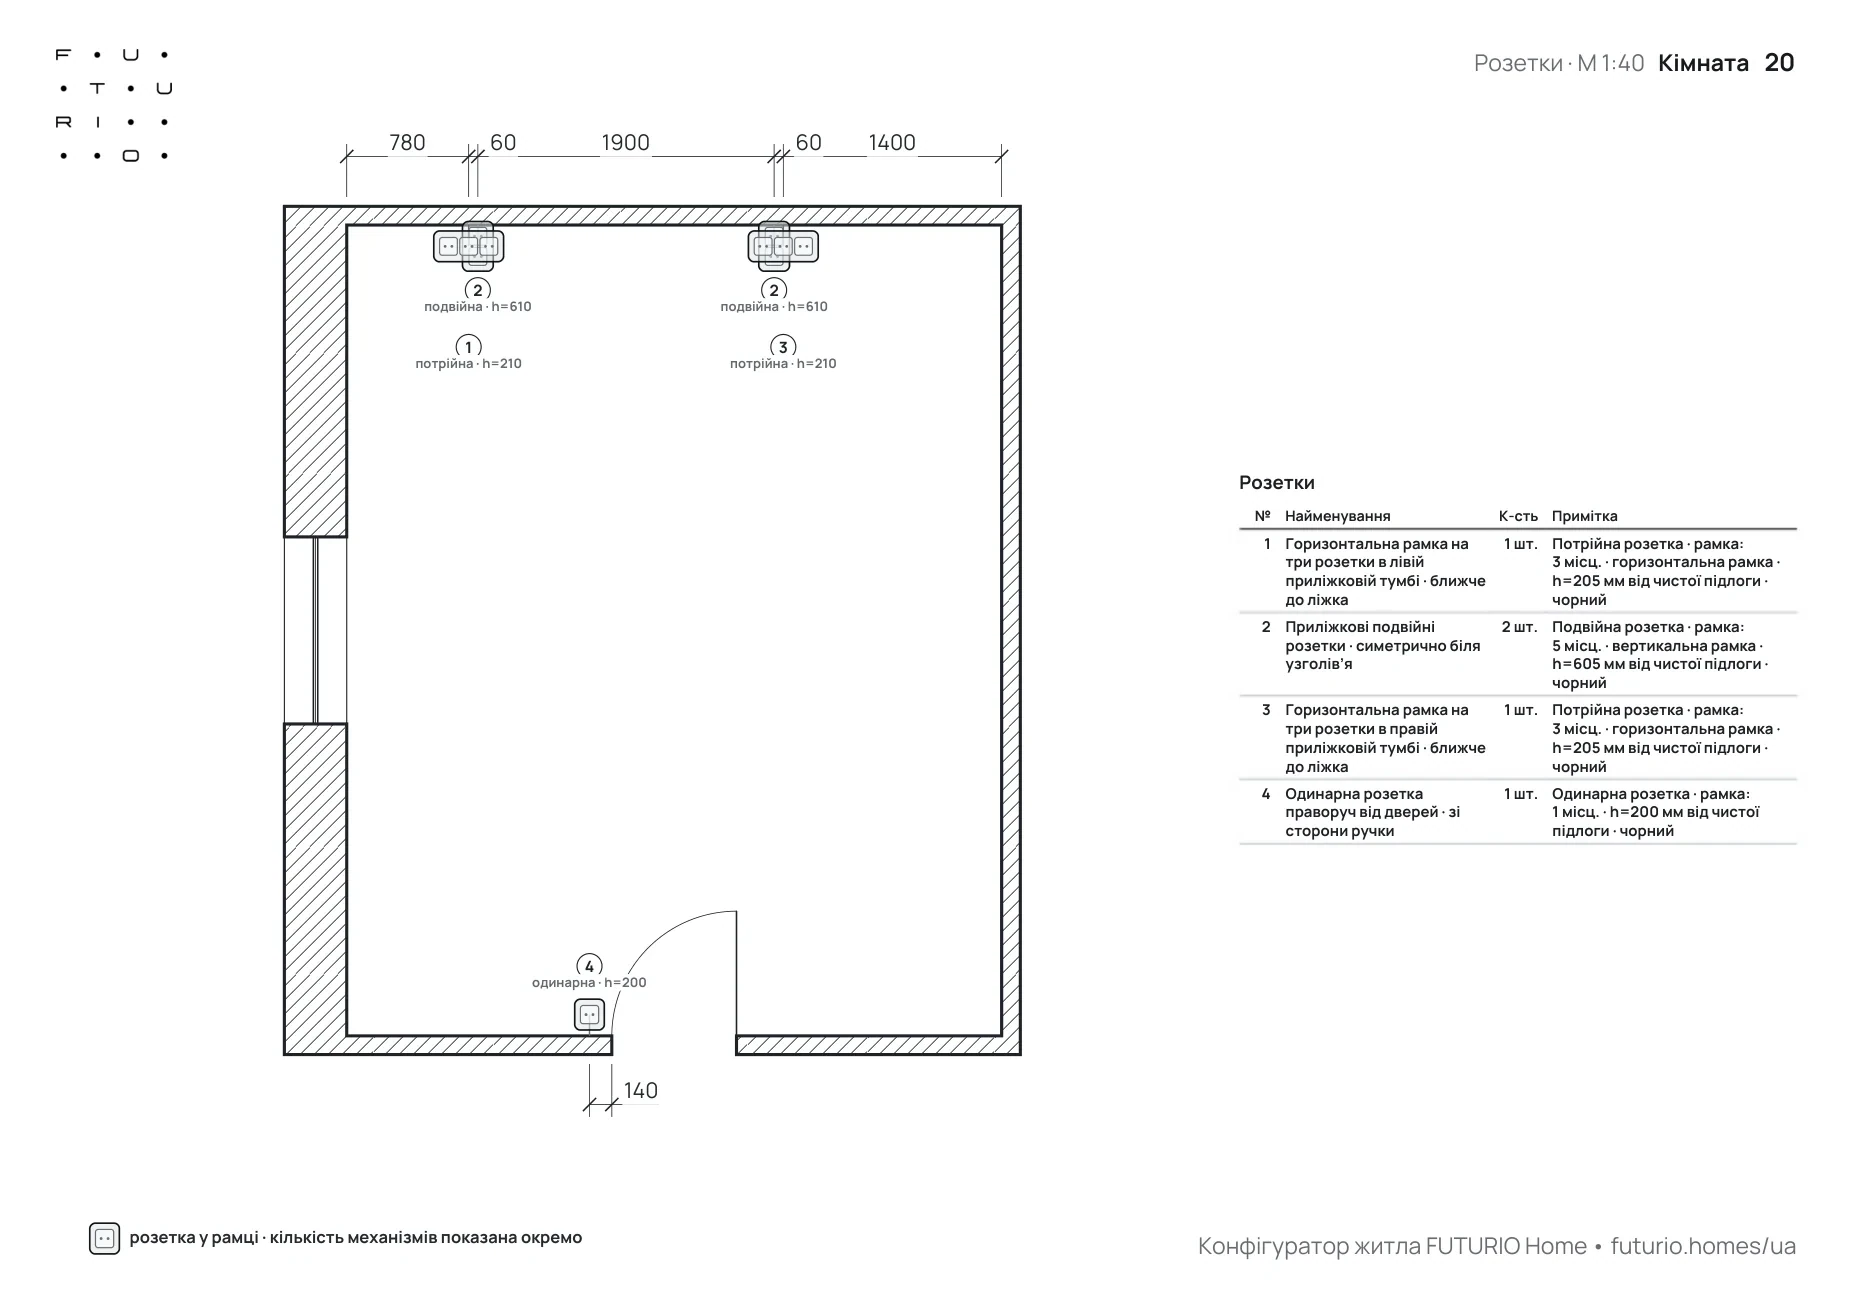
Automatic points. The configurator places some points itself, because furniture dictates where they go: the frames by the bed, the sockets in the nightstands and under a wall-mounted TV, a socket and switch by the door, the sockets above the kitchen worktop with a clearance from the sink and hob, the outlets for the fridge, oven, dishwasher and hob, and for an island a cable outlet from the floor.
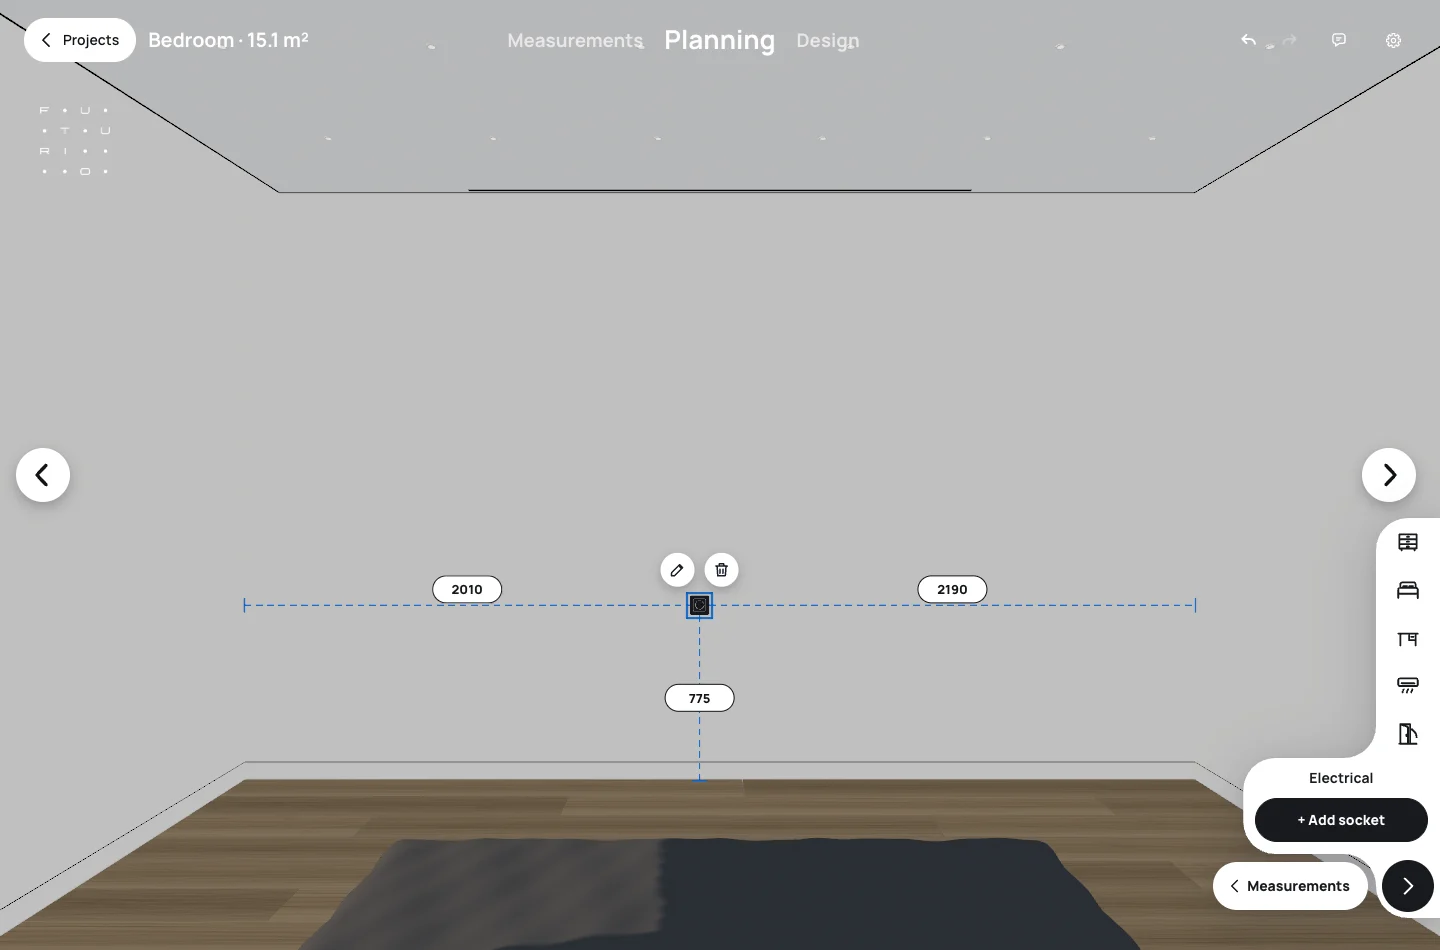
Your own sockets. You add the rest with the “Add socket” button and pick a ready-made height: “Low”, “Bedside”, “Above desk”, “Switch height”, “Above worktop”, “Behind TV” or “Air conditioner”. Any height or distance to a corner can be typed in millimetres. A socket that cannot be installed — under a window, on a door or its casing, behind a wardrobe carcass, on a column — the editor will not accept, and it explains what is in the way.
Frames and keys. The plus beside a socket expands it into a frame: add a socket or a switch and choose what a key switches — main light, accent light, bedside light or electric curtains. A frame can be turned horizontally or vertically.
Drawings. Everything you place goes into the drawing package: the sheets of sockets, switches and cable outlets, and the wall elevations. Every point is tied to the corners and has a height from the finished floor, and a table describes the contents of each frame. If you change the furniture layout, the points that depend on furniture move with it.
Before chasing the walls, check hidden services and the actual wall dimensions on site: the drawings repeat your measurements.
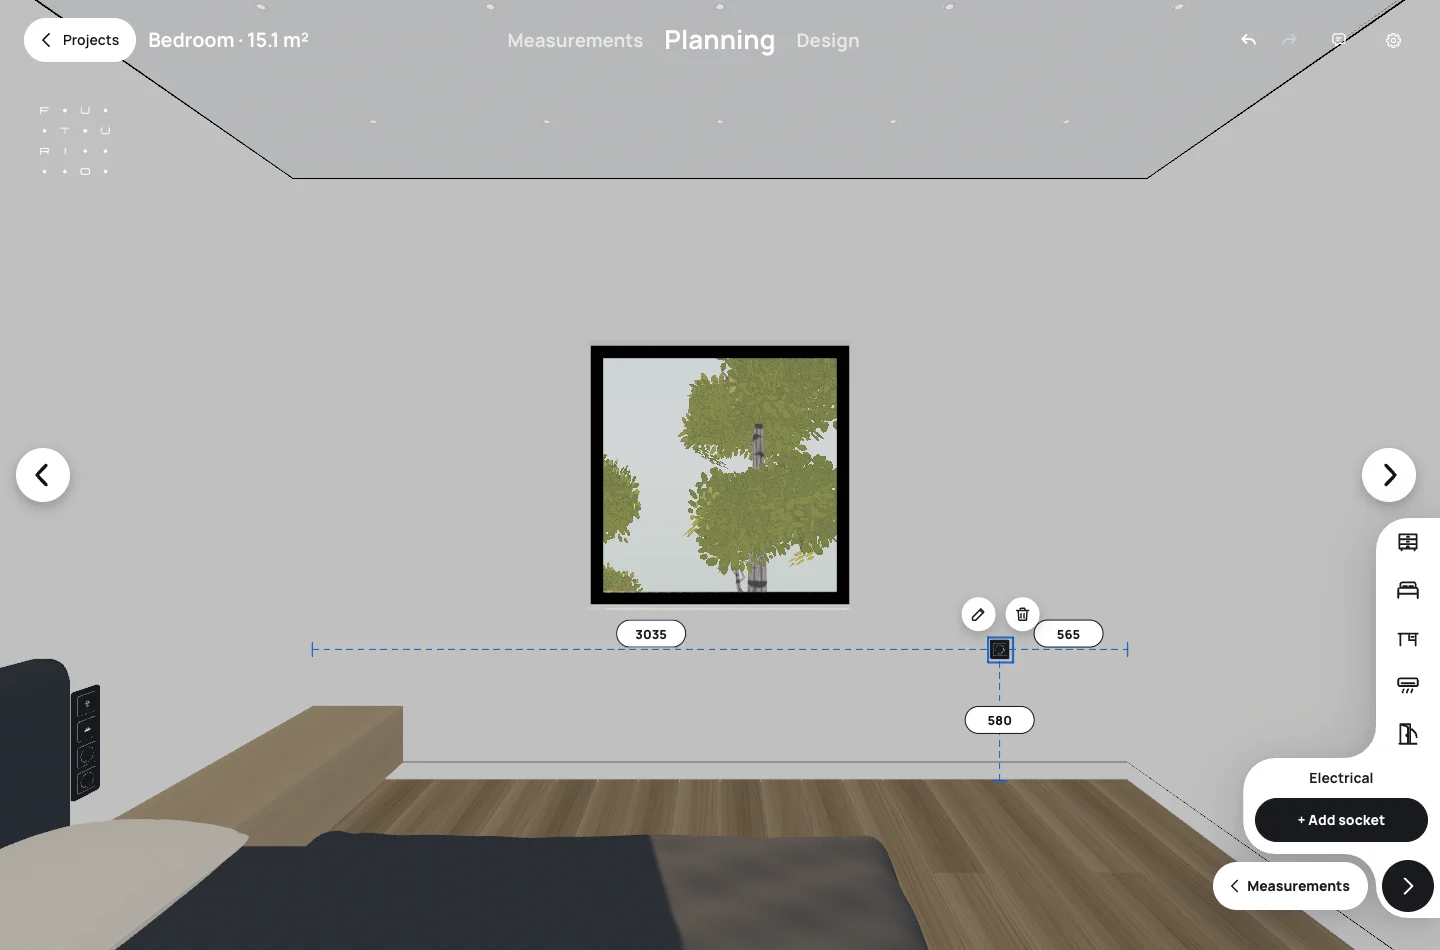 A socket to the side of a window
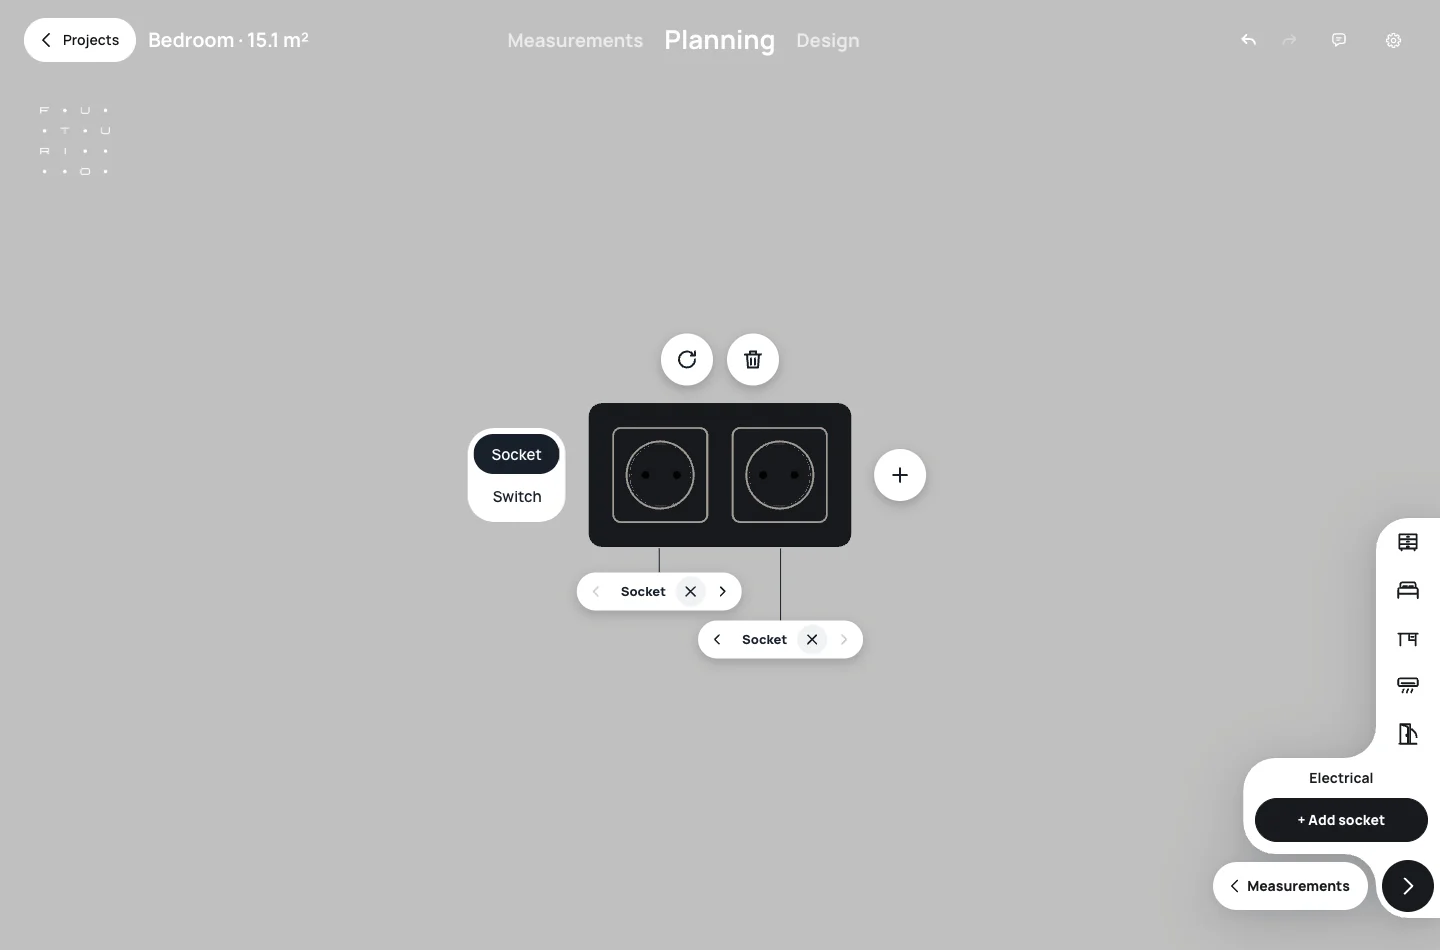 A socket or switch in a frame
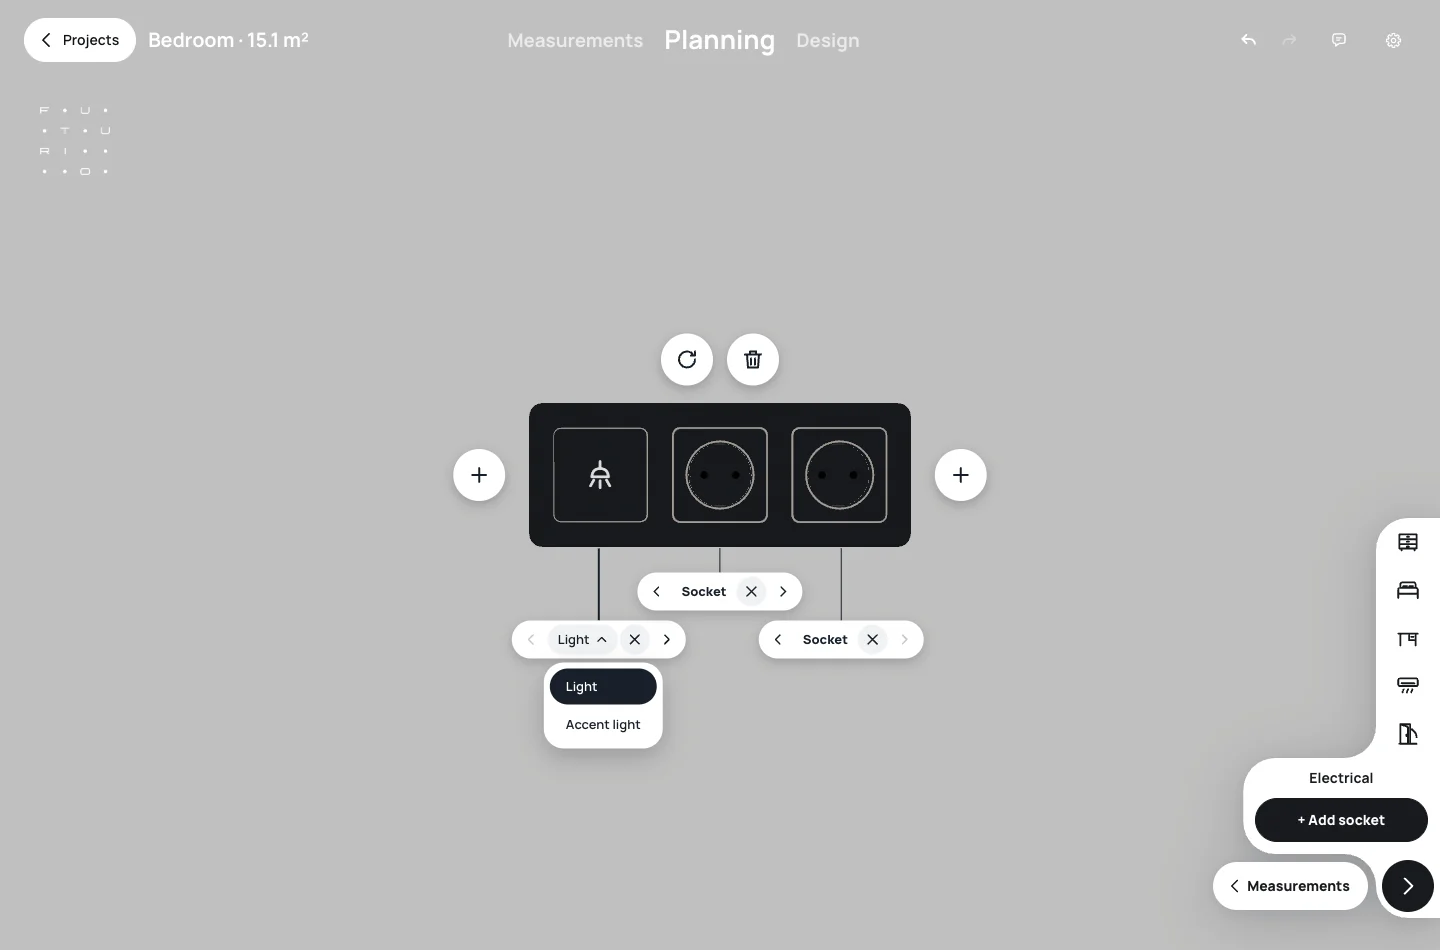 What the key switches
The furniture sets the places, you add your own points, and the electrician gets sheets with dimensions.
Frequently asked questions about sockets in an apartment
How many sockets does an apartment need?
By the code, at least one for every full or partial 4 m² of a living room, one per 10 m² of corridor and five in the kitchen, and a frame with several sockets counts as one. In practice, count from your appliances and add a reserve of one or two sockets in each zone.
What is the standard height of sockets from the floor?
There is no single standard: the code asks for a convenient height. Ordinary sockets go about 300 mm from the finished floor, by the bed 700 mm, above a desk about 900 mm, above a kitchen worktop about 1080 mm.
At what height should switches go?
The code recommends 0.8 to 1.7 m, on the door-handle side. The most convenient is about 1000 mm; in homes for wheelchair users, 0.8 m.
What do you measure a socket height from?
From the finished floor — the final covering, not the screed — to the centre of the frame. Otherwise a low socket can end up hidden behind the skirting.
What is the socket height above a kitchen worktop?
About 1080 mm from the finished floor for a 900 mm worktop, at least 300 mm from the sink and hob and not above them. Outlets for under-worktop appliances are about 200 mm up, in the neighbouring cabinet.
Can you put a socket in a bathroom?
Yes, but only outside zones 0, 1 and 2 — at least 0.6 m from the edge of the bath or shower tray, on a 30 mA RCD circuit and preferably with a cover. Some countries have stricter rules.
Which appliances need a dedicated circuit?
An electric or induction hob always, and usually also the oven, dishwasher and washing machine, the water heater and the air conditioner. The electrician makes the final decision based on the power of the models.
Why is there no socket under a window?
There is no general ban. But in our scheme the cable runs under the ceiling and drops to the point vertically, and under a window the opening blocks that path. There is also usually a radiator and curtains there, so a socket goes to the side of the window.
What does an electrician get from FUTURIO Home?
The sheets of sockets, switches and cable outlets and the wall elevations: every point has dimensions to the corners and a height from the finished floor, and a table describes the contents of each frame.
The easiest way to check your plan is to place the furniture and look at the points on each wall.
Verdict: count from appliances, place from furniture
A good socket plan starts not with the perimeter of the walls but with a list of what you use, and with the furniture layout. The code sets the minimum and the safety rules — bathroom zones, RCDs, dedicated circuits — while convenience comes from points that sit where each appliance lives: by the bed, desk, sofa, TV and kitchen equipment.
In FUTURIO Home you place sockets and switches on the walls of your home with the furniture already in place, and the electrician gets sheets with heights and tie-in dimensions. An honest limit: for now the configurator works room by room — for the kitchen, living room and bedroom — and the circuits, cable sizes and protection are decided by an electrician under the codes in force.
Spotted an error or want to add something to the article? Write to us at hello@futurio.ua and we will fix the text.
Plan the sockets in your own room
A few minutes on a plan now save chases and extension leads later.
Sources
- DBN V.2.5-23:2025 — design of electrical installations of residential buildings (the Ukrainian building code, in force from 01.01.2026)
- DBN V.2.5-23:2010 — previous edition of the Ukrainian code, section on sockets and switches
- DIN 18015-3:2016-09 — routing of wiring and placement of equipment in dwellings
- HD 60364-7-701:2007 — rooms with a bath or shower (in Ukraine: DSTU HD 60364-7-701:2022)
- IEC 60364-7-701 — electrical installations of rooms with a bath or shower
- Electrical Safety First — distance of sockets from water and heat sources